On Windows, data sources are stored in the Windows Registry. You can configure and modify data sources through the ODBC Administrator using a driver Setup dialog box, as described in this section.
On UNIX and Linux, data sources are stored in the odbc.ini file. On Linux, you can configure and modify data sources through the Linux ODBC Administrator using a driver Setup dialog box, as described in this section.
Note: This book shows dialog box images that are specific to Windows. If you are using the drivers in the Linux environment, the dialog box that you see may differ slightly from the Windows version. Windows-only and UNIX-only connection options are specifically noted by icons in the Setup dialog box descriptions.
When the driver is first installed, the values of its connection options are set by default. These values appear on the driver Setup dialog box tabs when you create a new data source. You can change these default values by modifying the data source. In the following procedure, the description of each tab is followed by a table that lists the connection options for that tab and their initial default values. This table links you to a complete description of the options and their connection string attribute equivalents. The connection string attributes are used to override the default values of the data source if you want to change these values at connection time.
To configure an Oracle data source:
1. Start the ODBC Administrator:
◦ On Windows, start the ODBC Administrator by selecting its icon from the DataDirect Connect program group.
◦ On Linux, change to the install_dir/tools directory and, at a command prompt, enter:
odbcadmin
where install_dir is the path to the product installation directory.
2. Select a tab:
◦ User DSN: If you are configuring an existing user data source, select the data source name and click Configure to display the driver Setup dialog box.
If you are configuring a new user data source, click Add to display a list of installed drivers. Select the driver and click Finish to display the driver Setup dialog box.
◦ System DSN: If you are configuring an existing system data source, select the data source name and click Configure to display the driver Setup dialog box.
If you are configuring a new system data source, click Add to display a list of installed drivers. Select the driver and click Finish to display the driver Setup dialog box.
◦ File DSN: If you are configuring an existing file data source, select the data source file and click Configure to display the driver Setup dialog box.
If you are configuring a new file data source, click Add to display a list of installed drivers; then, select a driver. Click Advanced if you want to specify attributes; otherwise, click Next to proceed. Specify a name for the data source and click Next. Verify the data source information; then, click Finish to display the driver Setup dialog box.
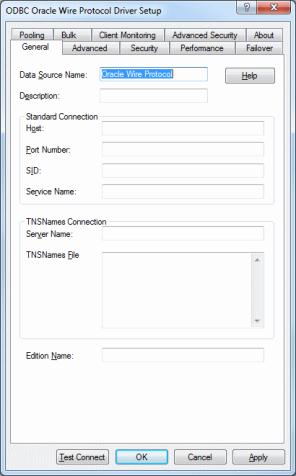
The General tab of the Setup dialog box appears by default.
Figure 18. General tab
Note: The General tab displays only fields that are required for creating a data source. The fields on all other tabs are optional, unless noted otherwise.
3. On this tab, provide values for the options in the following table; then, click Apply. The table provides links to descriptions of the connection options.
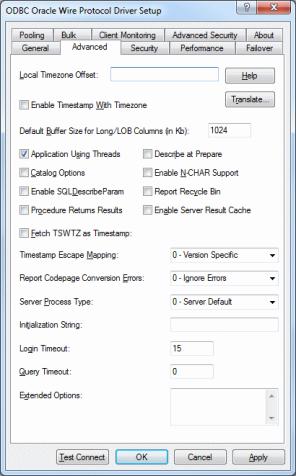
4. Optionally, click the Advanced tab to specify additional data source settings.
Figure 19. Advanced tab
On this tab, provide values for any of the options in the following table; then, click Apply. The table provides links to descriptions of the connection options.
Extended Options: Type a semi-colon separated list of connection options and their values. Use this configuration option to set the value of undocumented connection options that are provided by Progress DataDirect customer support. You can include any valid connection option in the Extended Options string, for example:
If the Extended Options string contains option values that are also set in the setup dialog or data source, the values of the options specified in the Extended Options string take precedence. However, connection options that are specified on a connection string override any option value specified in the Extended Options string.
Note: Do not specify the Extended Options configuration option in a connection string, or the driver will return an error. Instead, applications should specify the individual undocumented connection options in the connection string.
Translate: Click Translate to display the Select Translator dialog box, which lists the translators specified in the ODBC Translators section of the Registry. Progress DataDirect provides a translator named OEM to ANSI that translates your data from the IBM PC character set to the ANSI character set.
Select a translator; then, click OK to close this dialog box.
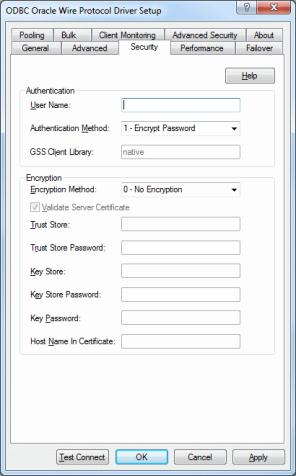
5. Optionally, click the Security tab to specify security data source settings.
Figure 20. Security tab
See Using Security for a general description of authentication and encryption and their configuration requirements.
See OS Authentication for a discussion of Oracle and SSL encryption.
On this tab, provide values for any of the options in the following table; then, click Apply. The table provides links to descriptions of the connection options.
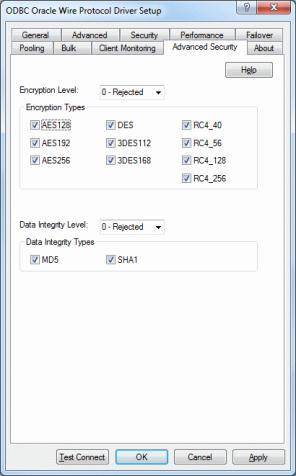
Refer to your Oracle documentation for a discussion of Oracle Advanced Security.
On this tab, provide values for any of the options in the following table; then, click Apply. The table provides links to descriptions of the connection options.
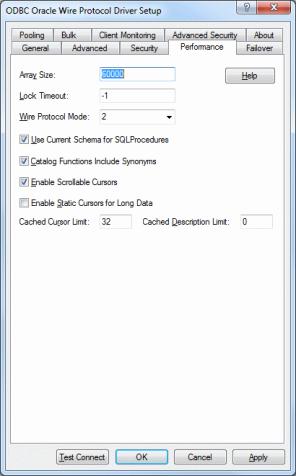
7. Optionally, click the Performance tab to specify performance data source settings.
Figure 22. Performance tab
On this tab, provide values for any of the options in the following table; then, click Apply. The table provides links to descriptions of the connection options.
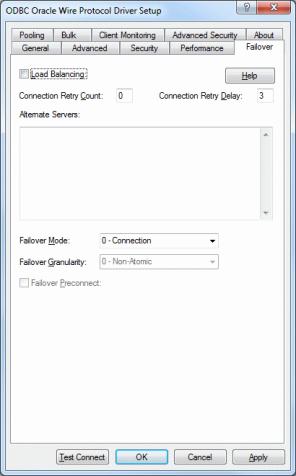
8. Optionally, click the Failover tab to specify failover data source settings.
Figure 23. Failover tab
See Using Failover for a general description of failover and its related connection options.
On this tab, provide values for any of the options in the following table; then, click Apply. The table provides links to descriptions of the connection options.
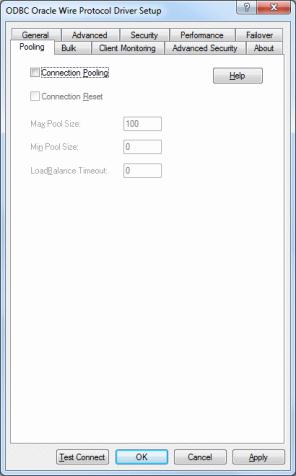
On this tab, provide values for any of the options in the following table; then, click Apply. The table provides links to descriptions of the connection options.
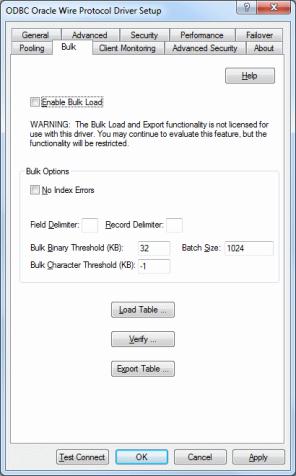
On this tab, provide values for any of the options in the following table; then, click Apply. The table provides links to descriptions of the connection options.
If your application is already coded to use parameter array batch functionality, you can leverage DataDirect Bulk Load features through the Enable Bulk Load connection option. Enabling this option automatically converts the parameter array batch operation to use the database bulk load protocol.
If you are not using parameter array batch functionality, you can export data to a bulk load data file, verify the metadata of the bulk load configuration file against the structure of the target table, and bulk load data to a table. Use the following steps to accomplish these tasks.
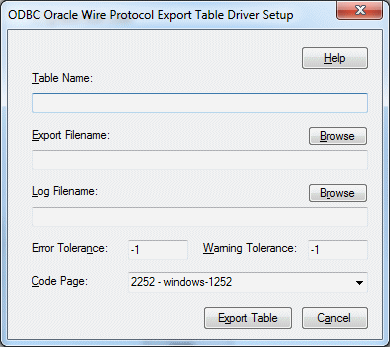
a. To export data from a table to a bulk load data file, click Export Table from the Bulk tab. The Export Table dialog box appears.
Figure 26. Export Table dialog box
Both a bulk data file and a bulk configuration file are produced by exporting a table. The configuration file has the same name as the data file, but with an XML extension. See Using DataDirect Bulk Load for details about these files.
The bulk export operation can create a log file and can also export to external files. See External Overflow Files for more information. The export operation can be configured such that if any errors or warnings occur:
▪ The operation always completes.
▪ The operation always terminates.
▪ The operation terminates after a certain threshold of warnings or errors is exceeded.
Table Name: A string that specifies the name of the source database table containing the data to be exported.
Export Filename: A string that specifies the path (relative or absolute) and file of the bulk load data file to which the data is to be exported. It also specifies the file name of the bulk configuration file. The file name must be the fully qualified path to the bulk data file. These files must not already exist; if one of both of them already exists, an error is returned.
Log Filename: A string that specifies the path (relative or absolute) and file name of the bulk log file. The log file is created if it does not exist. The file name must be the fully qualified path to the log file. Events logged to this file are:
▪ Total number of rows fetched
▪ A message for each row that failed to export
▪ Total number of rows that failed to export
▪ Total number of rows successfully exported
Information about the load is written to this file, preceded by a header. Information about the next load is appended to the end of the file.
If you do not supply a value for Log Filename, no log file is created.
Error Tolerance: A value that specifies the number of errors to tolerate before an operation terminates. A value of 0 indicates that no errors are tolerated; the operation fails when the first error is encountered.
The default of -1 means that an infinite number of errors is tolerated.
Warning Tolerance: A value that specifies the number of warnings to tolerate before an operation terminates. A value of 0 indicates that no warnings are tolerated; the operation fails when the first warning is encountered.
The default of -1 means that an infinite number of warnings is tolerated.
Code Page: A value that specifies the code page value to which the driver must convert all data for storage in the bulk data file. See Character Set Conversions for more information.
The default value on Windows is the current code page of the machine. On UNIX/Linux, the default value is 4 (ISO 8559-1 Latin-1).
Click Export Table to connect to the database and export data to the bulk data file or click Cancel.
Click Export Table to connect to the database and export data to the bulk data file or click Cancel.
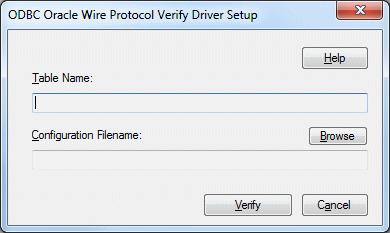
b. To verify the metadata of the bulk load configuration file against the structure of the target database table, click Verify from the Bulk tab. See Verification of the Bulk Load Configuration File for details. The ODBC Oracle Wire Protocol Verify Driver Setup dialog box appears.
Table Name: A string that specifies the name of the target database table into which the data is to be loaded.
Configuration Filename: A string that specifies the path (relative or absolute) and file name of the bulk configuration file. The file name must be the fully qualified path to the configuration file.
Click Verify to verify table structure or click Cancel.
c. To bulk load data from the bulk data file to a database table, click Load Table from the Bulk tab. The Load File dialog box appears.
Figure 28. Load File dialog box
The load operation can create a log file and can also create a discard file that contains rows rejected during the load. The discard file is in the same format as the bulk load data file. After fixing reported issues in the discard file, the bulk load can be reissued using the discard file as the bulk load data file.
The export operation can be configured such that if any errors or warnings occur:
▪ The operation always completes.
▪ The operation always terminates.
▪ The operation terminates after a certain threshold of warnings or errors is exceeded.
If a load fails, the Load Start and Load Count options can be used to control which rows are loaded when a load is restarted after a failure.
Table Name: A string that specifies the name of the target database table into which the data is loaded.
Load Data Filename: A string that specifies the path (relative or absolute) and file name of the bulk data file from which the data is loaded. The file name must be the fully qualified path to the bulk data file.
Configuration Filename: A string that specifies the path (relative or absolute) and file name of the bulk configuration file. The file name must be the fully qualified path to the configuration file.
Log Filename: A string that specifies the path (relative or absolute) and file name of the bulk log file. The file name must be the fully qualified path to the log file. Specifying a value for Log Filename creates the file if it does not already exist. Events logged to this file are:
▪ Total number of rows read
▪ Message for each row that failed to load
▪ Total number of rows that failed to load
▪ Total number of rows successfully loaded
Information about the load is written to this file, preceded by a header. Information about the next load is appended to the end of the file.
If you do not specify a value for Log Filename, no log file is created.
Discard Filename: A string that specifies the path (relative or absolute) and file name of the bulk discard file. The file name must be the fully qualified path to the discard file. Any row that cannot be inserted into database as result of bulk load is added to this file, with the last row rejected added to the end of the file.
Information about the load is written to this file, preceded by a header. Information about the next load is appended to the end of the file.
If you do not specify a value for Discard Filename, a discard file is not created.
Error Tolerance: A value that specifies the number of errors to tolerate before an operation terminates. A value of 0 indicates that no errors are tolerated; the operation fails when the first error is encountered.
The default of -1 means that an infinite number of errors is tolerated.
Load Start: A value that specifies the first row to be loaded from the data file. Rows are numbered starting with 1. For example, when Load Start is 10, the first 9 rows of the file are skipped and the first row loaded is row 10. This option can be used to restart a load after a failure.
The default value is 1.
Read Buffer Size (KB): A value that specifies the size, in KB, of the buffer that is used to read the bulk data file for a bulk load operation.
The default value is 2048.
Warning Tolerance: A value that specifies the number of warnings to tolerate before an operation terminates. A value of 0 indicates that no warnings are tolerated; the operation fails when the first warning is encountered.
The default of -1 means that an infinite number of warnings is tolerated.
Load Count: A value that specifies the number of rows to be loaded from the data file. The bulk load operation loads rows up to the value of Load Count from the file to the database. It is valid for Load Count to specify more rows than exist in the data file. The bulk load operation completes successfully when either the number of rows specified by the Load Count value has been loaded or the end of the data file is reached. This option can be used in conjunction with Load Start to restart a load after a failure.
The default value is the maximum value for SQLULEN. If set to 0, no rows are loaded.
Click Load Table to connect to the database and load the table or click Cancel.
11. Optionally, click the Client Monitoring tab to specify additional data source settings.
On this tab, provide values for any of the options in the following table; then, click Apply. The table provides links to descriptions of the connection options.
12. At any point during the configuration process, you can click Test Connect to attempt to connect to the data source using the connection options specified in the driver Setup dialog box. A logon dialog box appears (see Using a Logon Dialog Box for details). Note that the information you enter in the logon dialog box during a test connect is not saved.
◦ If the driver can connect, it releases the connection and displays a Connection Established message. Click OK.
◦ If the driver cannot connect because of an incorrect environment or connection value, it displays an appropriate error message. Click OK.
Note: If you are configuring alternate servers for use with the connection failover feature, be aware that the Test Connect button tests only the primary server, not the alternate servers.
13. Click OK or Cancel. If you click OK, the values you have specified become the defaults when you connect to the data source. You can change these defaults by using this procedure to reconfigure your data source. You can override these defaults by connecting to the data source using a connection string with alternate values.